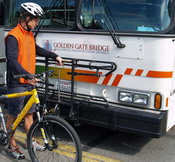
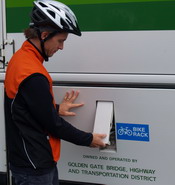
Front-mounted Exterior Bike Racks
Front-mounted bike racks are available on all Golden Gate Transit 40-foot buses. Each rack can accommodate up to three bicycles.
Loading Instructions
1. Be off your bike when waiting at the bus stop so that the bus driver will recognize you as a passenger. Remove ALL loose items, such as water bottles, air pumps, flags, bags, etc., before loading.
2. After the bus has come to a complete stop and you are sure that the bus driver sees you, move to the rack located on the front of the bus. Load bikes from the curb side ONLY. REMEMBER, make eye contact with the driver!
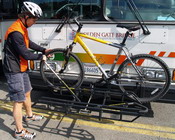
3. Squeeze up on chrome release handle located in the middle of the rack and lower the rack from its upright position.
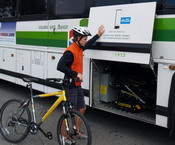
4. Lift the bike onto the rack, fitting the wheels into either the front or back positions. Wheel slots are clearly labeled for front and back tires.
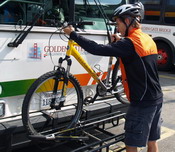
5. Raise the support arm over the front tire so that the hook rests next to the brakes.
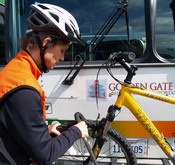
6. Do NOT lock your bike to the rack. Board the bus, pay your fare and leave the driving to GGT.
Unloading Instructions
- As the bus approaches your stop, inform the bus driver that you will be unloading your bike. This will ensure that the driver waits until you are clear of the bus before leaving the stop. Use the front door to leave the bus. Unload your bike from the curb side ONLY.
- Raise the support arm off the front tire and fold it down to its original position. Lift your bike out of the rack.
- If the rack is empty, fold the rack into the locked, folded position by squeezing the chrome release handle.
- Step away from the bus to the curb with your bike and all your belongings. Wait until the bus pulls away. Never proceed directly in front of the bus into traffic.
Underbelly Bike Racks
Underbelly bike racks are available on all Golden Gate Transit 45-foot buses. Each rack can accommodate up to two bicycles. Videos are offered below to assist.
Cyclist Alert: In San Francisco, due to safety considerations, underbelly bike racks may NOT be used at some Golden Gate Transit stops. Visit our Underbelly Racks at SF Stops page for a complete list of stops. In addition, these underbelly racks may NOT be used at any temporary bus stop.
Loading Instructions (see video)
The underbelly areas are for bikes only. Backpacks, saddlebags, etc., are not allowed under the bus.
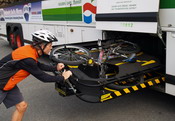
1. Be off your bike when waiting at the bus stop so that the bus driver will recognize you as a passenger. Remove all loose items, such as water bottles, air pumps, flags, bags, etc., before loading your bike.
2. After the bus has come to a complete stop, signal the driver to unlock the luggage bay door and move to the curb side bay door marked "BIKE RACK."
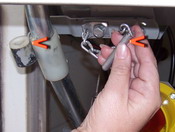
3. Lift the lever and push the door up, making sure that the door is fully extended. Attach the safety chain by inserting the pin in the hinge area (see orange arrows below).
4. Follow instruction #1 on rack: "Pull knob Up to Release."
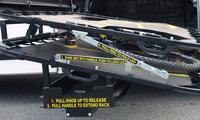
5. Follow instruction #2 on rack: "Pull Handle to Extend Rack." Pull rack toward you until it stops. Use caution when extending rack, checking for pedestrians or obstructions on sidewalk.
6. Follow instruction #3 on rack: "Raise Bed with Handle, Push to Lock Leg."
7. Orient your bike so that it matches the silhouette imprinted on the bed skin.
If loading your bike onto the upright position (upper skin), be sure to align tires in wheel tray and secure the 3 straps.
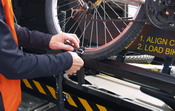
8. Follow instructions #4 on rack: "Pull Ring to Fold Leg" and lower upper skin.
9.Push the rack into the luggage bay until it locks automatically.
10.Close bay door securely. Be sure to keep your fingers clear of the door and latch.
Unloading Instructions (see video)
- As the bus approaches your stop, inform the bus driver that you will be unloading your bike. This will ensure that the driver waits until you are clear of the bus before leaving the stop. Use the front door to leave the bus. Unload your bike from the curb side ONLY.
- Repeat steps 3 through 6 of the loading instructions. If removing your bike from the upright position (upper skin), be sure to remove straps from tires prior to removing your bike.
- Repeat steps 8 through 10 of the loading instructions.
- Step away from the bus to the curb with your bike and all your belongings. Wait until the bus pulls away. Never proceed directly in front of the bus into traffic.
VIDEO: Loading a Bike
VIDEO: Loading a Second Bike
VIDEO: Unloading a Bike